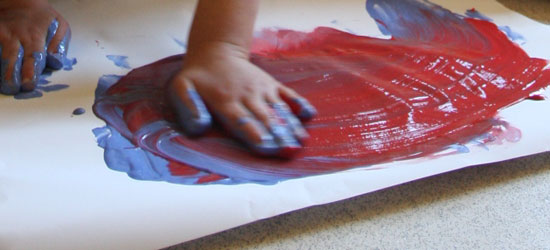
Finger painting
| June 2011A lot of mess, but a lot of fun! A colourful starch base paint encourages big free movements. Finger paint on large sturdy paper or paint directly on a tabletop or inside a sand and water tray. Lift off a print on paper, if desired.
You will need
- Finger paint. Use commercially prepared finger paint or the recipes on the next page.
- A supply of large sturdy paper (have enough ready)
- Table top or tray with a smooth water resistant surface
- Tools for texturing; a stiff brush, comb, cardboard template.
- An apron and newspaper for protective measures
- A bucket of water and rag for handy clean up
- Newspaper to dry the paintings
Here’s how to finger paint
- Dip a sturdy piece of paper in water.
- Place on table and smooth out the bubbles.
- Spread uncoloured starch base over the wet paper.
- Add colour to areas as wanted (light colours first) Use drops of food colouring or sprinkle on powdered paint. Alternative: colour the starch with your choice of colour and then cover the paper.
- Use fingers, hands, and fists to swirl the colour. The back of the little fingernail makes a good tool!
- Make patterns with a stiff brush, sponge, comb or cardboard template.
- Spread finished painting on a newspaper to dry (one or two hours or overnight).
- It may need to be ironed or pressed under a weight when it is dry.
Recipes for finger paint
Corn flour paint
- ½ cup corn flour
- 2 cups hot water
- Food colouring, liquid or powdered paint
Dissolve the corn flour in a small amount of cold water and gradually add the hot water. Cook until thick and clear, stirring constantly. Water can be added to thin the paste if necessary. Colour as desired.
Liquid starch paint
- 1 Tbs liquid starch
- Food colouring, liquid or powdered paint
Pour liquid in the centre of wet paper (or on table top). Colour with drops of food colouring or sprinkle with a small amount of powdered paint. Work colour and starch together and spread over paper with hand or brush.
More fun with finger paints
EXPERIMENT See what hand and arm movements can do. You don’t need to have a definite composition in mind. See what the swirls of paint suggest, or just enjoy the blend of colours and patterns. You can smooth out the paint and begin again. The joy is in creating.
“BLOTTOS” Finger paint a piece of paper. Fold it in half with the paint on the inside. Using your finger, draw on the top (unpainted) half-fold. Unfold for a reverse print. It’s a good way to make a mask, a butterfly, or insect. For an animal mask, create a furry texture with a stiff brush.
“LESS MESSY FINGER PAINTINGS” Put finger paint between two pieces of wax paper on a tray. Use fingers to blend and draw patterns. When dry, cut out shapes for window pictures.
BACKGROUNDS Add details with paint, chalk, coloured pencil, or paper cutouts when finger painting is dry. Finger paint a sea, add the boat; paint a jungle, add a monkey, etc.
CUT OUT SHAPES When dry, cut out shapes that the paintings may suggest. Save the interesting shape scraps to combine in paper collages.
TEXTURES Add sand, glitter, or sawdust to the paint to create interesting textures.